The Big Picture...

I've always had a knack for being able to take the occasional good snap shot (haven't most of us?). However I want to take my photography to the 'next level' so I've set myself a goal: mastering property photography.
This blog shares my journey along my way to mastery of property photography, from the outset to where I am now, and gives you the opportunity to get involved too.

Project Status...

Project 52 AU (a project by Evan Walters to photograph 52 Canberra-region properties in 52 weeks) is currently in "pre-season" status and kicks off September 1, 2009.
I am quickly running out of rooms in my own home to photograph. If you have access to a presentable property in the Canberra region I need your help. I'd love to photograph your property for you. Please contact me.

My Nursery

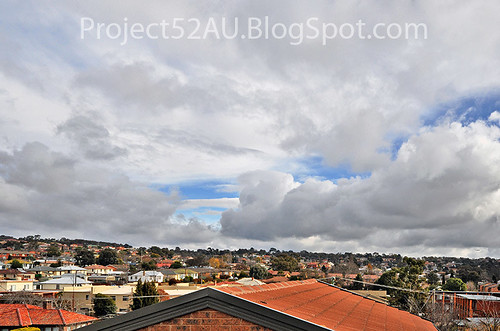
Another photo taken from the south side of my home during winter. This one was taken at about 1.30pm (about 4 hours of sunlight left so the sun was pretty high in the sky).

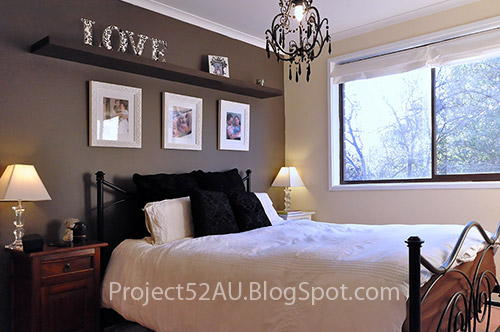
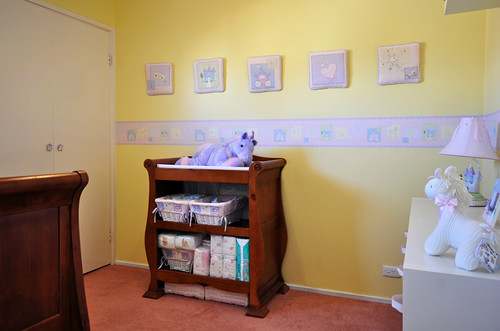
This room proved a challenge for me because of its tiny size - 3m x 3m (that's about 10 feet for my North American friends). There is a window just out of shot to the top left hand side of this photo. I also turned on the overhead lighting which is a three halogen light (we have energy saving bulbs in them), one of which is pointed directly at the change table which is the cause of the dark shadow on the change tables right hand side. The photo was taken from the doorway as I could not get a good photo from inside the room itself.

I'm pretty happy with how this shot came up. I think the photograph shows a fair representation of the room. The alternative was to take a wider angle shot but I didn't like how these photos looked.

What I learnt from this photoshoot:
1. You don't need to photograph everything to give a fair representation of the room. The purpose of real estate photography is to get people interested in the house, not (in most cases) to sell the house.
2. I'm still not watching the edges of my photographs. The shelf in the top left of the photo annoys me but in the interest of being an "ethical" photo editor, the shelf is actually there, so I couldn't justify taking it out.

To view the EXIF Info please click the image as I have posted these details on Flickr.

As always I'd love to have your feedback on my work.

My Entertainment Room

This photo was taken on a gloriously sunny Canberra winters day on the south side of my home (meaning the sun never reaches this side of the property). It was about 3.00pm (around two of sunlight remaining at this time of year).

Technically this is a third bedroom and for the size and area my home is located in this is what it is likely to be used as so I've tried to represent the area as a large living space.

What I learnt from this photoshoot:
1. I live in a home with pink carpet (ok, so I already knew that, now you do too).
2. Find the flattering shot. This room has multiple features including the doorway on the right hand side and wall-to-wall wardrobe on the left hand side. I photographed the room from both perspectives and for me the doorway and outdoor courtyard came up much better.
3. Be careful when choosing your shot height. Taking the shot from waist height tends to flatter the room as it captures it square on. For me, this shot seems just a tad too low down, I keep wanting to see this photograph just a little more square on.

To view the EXIF Info please click the image as I have posted these details on Flickr.

As always I'd love to have your feedback on my work.

Learning To Create Great Photographs

Is it just me or does Canberra only get two different types of days during winter in:
  1. Foggy mornings followed by majestic sky blue days
  2. Cloudy days with only fleeting moments of sunshine


View - Scattered Cloud Day, originally uploaded by Evan Walters - The Learner Property Photographer.

This is a shot I took from my deck around 12.30pm on Sunday. I think is a perfect example of the second type of winters day in Canberra. Even the weather seemed confused with patches of blue mixed with patches of dark cloud.

As soon as the sun would come out I'd grab my camera and start opening curtains, turning on lights, decluttering, and *poof* the sun would disappear again! This made for rather tricky photographing conditions, eventually I gave up and focused my energy elsewhere.


Whilst I'm learning (in fact always, I have a bit of a perfectionist streak) I want to take as many great photography shots as possible.

So what makes the difference between creating an average and a great photograph?

Although your answer may be different to mine, for me the difference between an average shot and a great shot seems to boil down to one of two things:
  1. Experience
  2. Luck
Nothing will increase my experience but more experience (this is why I'm doing Project 52 AU, it's a large part of what Project 52 AU is about). However I believe that you can create your own luck and that the secret to increasing one's luck has been known for around 2,000 or so years:
“Luck is what happens when preparation meets opportunity.”
Seneca (Roman philosopher, mid-1st century AD)
Rather than continuing to make unchecked mistakes as I have in the past few weeks, I decided to invest my time this weekend trying to increase my luck. I've done so by making better preparations and by creating a system for recording the success of my photography.

The changes I've made make sense to me and are something I should have thought of from the start (I was a boyscout - "be prepared"). I'm hoping that by making these changes I will be better able to make more from the opportunities and as a result will create more great photographs.


What are your tips, tricks, ideas and thoughts on the "secret" of creating a great photograph?

My Kitchen - Perspective Two

This is the other perspective of my kitchen. My mother in law has said she prefers this one (thanks Mum!).

Let me know your thoughts...

My Kitchen

This is the a photo that I took after wrapping up my photo session. I've been challenged to find nine different perspectives from which to photograph a room, and as a last minute thought I thought I might try a high shot looking down into the kitchen. Turns out it is one of my favourite shots from the day.

This photo was taken on an overcast day late in the afternoon (about 4.30pm, about half an hour of light left outside, but already very dark as seen in the kitchen window). This photo was lit using an on-camera speedlight (flash) bounced off the roof.

What I learnt from this photoshoot:
1. Always learn from your mistakes - I didn't learn from lesson one last week (establish a pre-shoot checklist) so most of my images were again shot at ISO 2000.
2. Watch reflections. The kitchen and bathroom have to be the worst rooms in the house for reflections. This photo has had a lot of manual editing to remove some ugly reflections and there are still many reflections in the shot I wish were not there.
3. Make sure you can fit it all in. Sadly this room does not show the breakfast bar at all and gives the impression that the ktichen is lacking storage and bench space. It is, to a degree, but not having the breakfast bar in the shot is a real shame
4. When taking a three-wall shot (from the middle of the room showing three walls) stand in the middle of the room. I find the angle of the floor a real distraction in this photo.
5. I need some more basic equipment. Gels for correcting colour temperature (the fridge, stove, rangehood, and blind should alll be white in this photo, they aren't). And a diffuser to avoid over exposing parts of the photo with the flash.
6. Always save your finished work. I did a quick edit of the other photo I have posted to flickr and did not save my changes. Big mistake. I ended up correcting the perspective of the photo and have to compress it to JPEG twice (the quality of the photo has suffered as a result).

To view the EXIF Info please click the image as I have posted these details on Flickr. I have also posted a second photo on flickr which shows my kitchen from a different perspective. As always I'd love to have your feedback on my work.

Frequently Asked Questions


FREQUENTLY ASKED QUESTIONS


Q1. Who will photograph my property?

Q2. What do you charge to photograph my property?

Q3. Why offer a free photo package?

Q4. What's the difference between the two photo packages?

Q5. What's common to both packages?

Q6. Are you only taking bookings for after September 1st 2009?

Q7. When will you be able to photograph my property?

Q8. I live outside Canberra, are you still available?


Q1. Who will photograph my property?

Evan Walters - The Learner Property Photographer

Top


Q2. What do you charge to photograph my property?

At present I have two pricing options:

  1. $150 (including a 100% "love your photos or don't pay me a cent" guarantee).
  2. Free!

Top


Q3. Why offer a free photo package?

Right now, what I need more than anything is access to different properties so that I can learn how to shoot great looking photos in a variety of different settings. I am prepared to offer a free package in exchange for access to your property. The free package may only available for a limited time.

Top


Q4. What's the difference between the two photo packages?

The $150 photo package is a little different to the free package for several reasons:

  • The $150 package includes as many photos as required to properly capture your property. The free package includes 8 - 10 photographs.
  • The $150 package includes a "love your photos or don't pay me a cent" guarantee. With the free package you still get my best work.
  • The $150 package allows me to maintain, repair and upgrade my equipment and allows me to further my education. The free package provides me with access to your home.
  • The $150 package guarantees you your time and date at the time of your booking. The free package is offered on a "stand-by" basis and your booking date and time will be confirmed three days prior.

Top


Q5. What's common to both packages?

With either package:

  • You will receive your photographs delivered on CD within 24 hours.
  • Your images will be ethically edited in Adobe PhotoShop to improve the overall image quality (ethical editing refers to editing non-permanent features of the photo only).
  • I reserve the right to use one of your photographs in my portfolio of work, to post the photo to my blog, and to post details of what I have learnt from your photography session.

Top


Q6. Are you only taking bookings for after September 1st 2009?

I am available now. September 1st is when my personal challenge (52 Canberra-region properties in 52 weeks) starts. I am happy to photograph your property prior to the challenge if this suits your needs better.

Top


Q7. When will you be able to photograph my property?

At present I am available all day Saturday, other times can be also arranged by request. The best times of the day are early morning and twilight (sunset).

Top


Q8. I live in outside Canberra, are you still available?

Yes! I am prepared to travel up to one hour in a single direction from the ACT border. I am also available for photographing South Coast properties by request.

Top


If you're question is not on this list, please contact me. Thank you.

My Master Bedroom

This is the first photo I took on the day. It was about 3.30pm in the afternoon (an hour or two of sunlight remaining at this time of year). The room faces north (which means that it gets the sun all day). The sun was starting to set so there was strong sunlight being bounced off a cream-ish coloured wall to the right hand side of the shot.

What I learnt from this photoshoot:
1. Establish a pre-shoot checklist which includes checking the camera settings. There was plenty of light in the room so this shot shouldn't have been taken at ISO 2000. I just didn't check and didn't realise until after I reviewed my photos.
2. Always always always check the viewfinder before taking the shot. Most of my other shots from this session show the clutter under the bed. Additionally, shots taken from the window side of the room showing the wall to wall wardrobe feature a closed door (trying to keep the cats out) which has the result of making the room feel small and closed in.

To view the EXIF Info please click the image as I have posted these details on Flickr. As always I'd love to have your feedback on my work.

Book Your Property Photography Shoot

Evan, I am interested. Here are my details, please contact me as soon as possible:


NOTE: If you have any questions, please visit my frequently asked questions page. If your question is not on the list, please contact me. Thank you.
 

arwen's nursery : canberra property photography

my home theater entertainment room

confused weather

kitchen

master bedroom

twilight shot

living room

home cinema